• Nav Social Menu

    • Facebook
    • Instagram
    • Pinterest
    • YouTube

Inky Hands Warm Hearts

Rubber Stamping & Scrapbooking Ideas and Classes

  • Home
  • Blog
  • Shop
    • Online Store
    • Paper Pumpkin
    • Shop the Clearance Rack
    • Tutorial PDFs & Retired Products Store
  • Join My Team
  • Events & Classes
    • Local Events
    • Other Events
      • Game Night – Inky Hands Warm Hearts
  • Connect With Me
    • Contact Me
    • Socials
      • YouTube
      • Facebook
      • Instagram
      • Pinterest
  • Memberships

Split Card Technique This Week for Tips, Tricks, Technique Friday

November 5, 2021
Leave a Comment

5 Nov

It is Friday! Happy Fri-YAY everyone! What does that mean is for the blog? – Tips, Tricks, and Techniques. Today I have a Technique to show you called Split Card. This week we focused on the Eden’s Garden Collection. The Bundle from the Collection is an Early Release from the January-June 2022 Mini Catalog. The rest of the products offered in the collection are offered while supplies last, so do not miss out on them.

These two cards were made using the Eden's Garden Collection by Stampin' Up! and showcase the Split Card Technique.

The cards above are made using the Split Card Technique. Let’s begin.

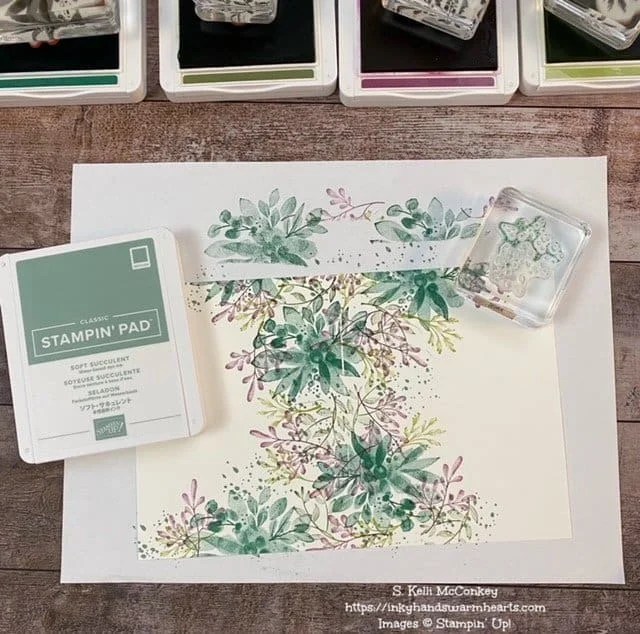
  • Take a piece of 8-1/2″ x 5-1/2″ piece of Basic White cardstock and score it down the middle at 4-1/4″.
  • To do the Split Card Technique you need three to four colors of ink and the same number of stamps, one per color.
  • Staring down the score line start stamping. You can also curve around slightly to the top or bottom of the cardstock.
  • Start stamping with the largest image first and work your way down to the smallest. Until you use all your colors and stamps.
  • Last fill in your open spaces with a splatter image stamp in a different coordinating ink color.
  • Cut the cardstock in half down the line you scored and stamped on.
  • Next, cut 1/2″ or 1/4″ off each edge down the long side where the most white space is.
  • Stamp a setiment of your choice in one of the ink colors used already.
  • Attach both stamped fronts individually to two separate pieces of matching color of cardstock as shown above.
  • Add ribbon, twine, or cording (optional).
  • Stamp a corner of Basic White cardstock to match the front on both cards.
  • Adhere to the inside.

I hope you enjoyed this Split Card Technique. Now try it, comment below, and tell me how yours turned out. Also, don’t forget I will have a Facebook Live Session tomorrow on my Facebook Business Page, where I will demonstrate yet another project. Feel free to comment below with any questions you may have, and I will be happy to help in any way that I can. If you want to see last Friday’s blog post showing another Tip, Trick, or Technique, click here.

Click the hyperlinks below to purchase any items used to make these beautiful cards.


Tips, Tricks, & Techniques Friday Product List
Eden's Garden Cling Stamp Set (English)
[157823]
Color & Contour Photopolymer Stamp Set
[154994]
Shaded Spruce 8-1/2" X 11" Cardstock
[146981]
Basic White 8 1/2" X 11" Cardstock
[159276]
Shaded Spruce Classic Stampin' Pad
[147088]
Garden Green Classic Stampin' Pad
[147089]
Pear Pizzazz Classic Stampin' Pad
[147104]
Soft Succulent Classic Stampin' Pad
[155778]
Rich Razzleberry Classic Stampin' Pad
[147091]
Simply Elegant Trim
Simply Elegant Trim
[155766]
Stampin' Seal
Stampin' Seal
[152813]
Bone Folder
Bone Folder
[102300]
Paper Snips
Paper Snips
[103579]
Paper Trimmer
Paper Trimmer
[152392]
Simply Shammy
Simply Shammy
[147042]
Clear Block Bundle
Clear Block Bundle
[118491]
Grid Paper
Grid Paper
[130148]
Stampin' Cut & Emboss Machine
[149653]
Add All to Cart

Please use when placing an order under $150 by entering this hostess code before finalizing your shopping cart. Orders of $50 or more will receive a free monthly gift from me.

Don’t forget, if you put in an order ($35 minimum) by tomorrow, Saturday, November 6, 2021, by midnight, I’ll send you the make and takes from Tuesday and Thursday’s Live Sessions for free! (You’ll need the stamps, ink, and adhesive to complete these projects, but they will include all the paper and embellishments.) If your order is over $50, you’ll get all the supplies plus a free monthly gift from me!

Thank you for supporting my small business and ordering from me.

But don’t miss out, your order MUST be in by Saturday at midnight to receive both free Make and Takes!! 

And you must use the Hostess Code.

November’s Hostess Code is D44RDF4U. Use it for orders under $150.00.

Using that hostess code helps me bring you videos every week and helps me provide the pdfs and gifts of appreciation. Thank you again for your support!
You can shop in my online store here. 

As always, thank you for visiting me 🙂

I appreciate your comments and/or feedback and see you Saturday afternoon at 4 pm EST for Bonus Project Saturday Facebook Live Edition!

Thank you for supporting my small business!

See you next week!

♥Kelli

Share this:

  • Click to share on Facebook (Opens in new window) Facebook
  • Click to share on Pinterest (Opens in new window) Pinterest
  • Click to email a link to a friend (Opens in new window) Email

Filed Under: Techniques, Tips & Tricks Friday Tagged With: Eden's Garden, Simply Elegant Trim, Split Card Technique, Stampin Up, Techniques, Techniques Tips and Tricks

Previous Post: « Eden’s Garden Gift Card Holder – Facebook Live Thursday
Next Post: Eden’s Garden Christmas Card – Bonus Project Saturday Live »

Reader Interactions

Leave a Reply Cancel reply

Your email address will not be published. Required fields are marked *

Primary Sidebar

Meet Kelli

S. Kelli McConkey
Independent Stampin' Up!® Demonstrator

Subscribe to my Newsletter

Receive news, special offers, and updates

2025-2026 Annual Catalog

Stampin' Up! 2025-2026 Annual Catalog
May 6 2025 - May 4 2026
View Online | Shop Online

September-December 2025 Mini Catalog

Stampin' Up! September-December 2025 Mini Catalog
September 3rd - January 5th
View Online | Shop Online

Achievements

Where Can I find…?

Reminisce with Me

Disclaimer

My name is S. Kelli McConkey, I am the designer behind Inky Hands Warm Hearts. As an Independent Stampin Up!® Demonstrator, I am responsible for the content on this site. Stampin Up! does not endorse the use of this blog or its contents. Photos containing Stampin Up! products and images are © Stampin Up!

Footer

Important Links

  • Home
  • Blog
  • Online Store

S. Kelli McConkey
Independent Stampin' Up!® Demonstrator

Blog Updates

Enter your email address to subscribe to my blog and receive notifications of new posts by email.

Join 644 other subscribers

Copyright © 2025 S. Kelli McConkey, Inky Hands Warm Hearts · Theme Customisation by Catherine Carroll